ShopDreamUp AI ArtDreamUp
Deviation Actions


Suggested Deviants


Suggested Collections


You Might Like…


Description
DOWNLOAD AT OWN RISK!!!
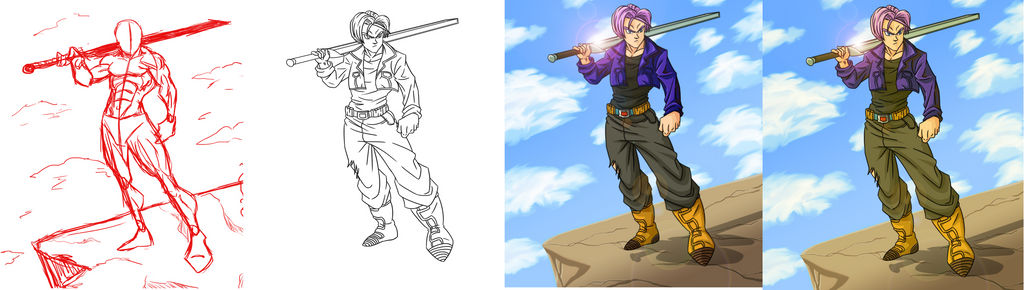
This isn't a tutorial this is just my process peeps, take from it what you will. I just randomly decided to do this so some things are missing and I apologize for that.
Step 1: Picking your Pose(Not shown here)
Although I haven't shown it here, I sketch with stick figures a million possibilities on what I want. This can range from a standing pose to flying or even death poses. I just draw as many as I want and decide which one I like best and draw from that.
Step 2: Sketch out Pose
This is the red dude. Okay once I have decided on the pose I sketch it out and I was lazy and didn't use perspective lines which is why the drawing looks a little awkward. Refine and refine till it looks the way you originally drew in step 1.
Step 3: Drawing the Features(Not shown here)
These are the clothes, face and accessories(sword). Once everything looks fine I move on to the next step.
Step 4: Inking your Piece
I basically just grab an black color and small brush and draw over my sketch on a different layer. I always zoom out to see how it looks because some things look crap zoomed out and in the long run it hurts the picture, so always check your stuff as you go.
Step 5: Flat colors(Not shown)
These go beneath your inks layer, just the flat colors of the pic. This is also where I start the BG and as you can see I sketch it but color it line less. This is because BG's look silly with black lines where they aren't needed.
Step 6: Shades
Once the flats are down time to lay some shades on that bad-boy. Most pro's work from darkest to lightest, I work from medium. Only because I'm still a noob and have to plan my shades and highlights out. You'll need to decide where your light source and work from there.
Step 7: BG refinement
Once I get the shades of the char down I work on the BG more. I add the fine features like light source and shades of the rocks. Then once that looks all nice I add in the clouds(Separate layer, beneath the rocks).
Step 8: After effects
This is the under-shade(Notice how trunks is yellowish) and lens flare. I almost always add an under-shade I do this by creating a new layer above the colors make it an clipping mask and filling it in with a color. Remember use warm colors(yellow,orange etc) in light places and cool colors(blues, purples) in dark places. Once I got that I lower the opacity of the layer to something around 20-30%(up to you) this makes it show through. Once that is done I check everything make sure it looks good, then I merge all layers and if the picture needs it I add an lens flare and BAM done.
Because this is my process and not an official tutorial I know things will be confusing so ask questions and I'll try answer them. I will probably do an actual tutorial sometime in the future but not now.
Trunks (C) Akira Toriyama
Image size
3532x1000px 2.41 MB
© 2010 - 2024 CrimsonCypher
Comments14
Join the community to add your comment. Already a deviant? Log In
Nice tutorial!  (Smile)") I will try to follow it sometime. What's a clipping mask, by any chance?
I will try to follow it sometime. What's a clipping mask, by any chance?